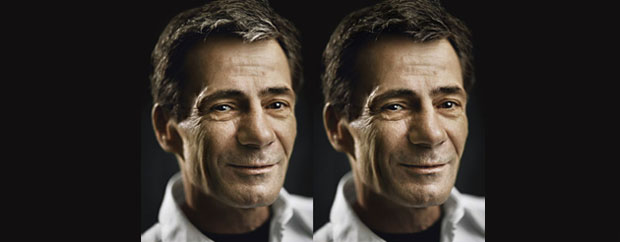
Removing gray hair using Photoshop is a great way to give yourself a digital hair dye. As with most Photoshop techniques, the trick is to make your changes without making the photograph appear unnatural. In the above photograph notice how I removed most of the gray hair from the man’s head but there are still small highlights of grey hair. This ensures that the photograph remains realistic looking.
1. To do this yourself you simply need to click on the “burn” tool
 Photoshop burn tool” />
2. Now ensure your “range” is set to “midtones” (since gray hair is a midtone) and set your exposure to about “20%”. This ensures your changes to the hair color look natural. If you set your exposure higher the changes will be much more dramatic. In the end it’s up to your artistic preference. If you set it to 20% you can do multiple brush overs to get the desired color.

That’s how you get rid of gray hair in Photoshop.
Here is another method:
Step 1: Prepare the Image
Before you begin using Photoshop to eliminate gray hair, you need to prepare the image. To do this, open the image you want to edit in Photoshop. Once the image is open, make sure to zoom in to the area that contains the gray hair. This will make the editing process easier.
Step 2: Create a New Layer
Creating a new layer will help you keep the original image intact. To create a new layer, go to the Layers panel and click the “Create a new layer” icon. Name the layer “Gray Hair” and click “Ok”.
Step 3: Select the Gray Hair
Once you have created a new layer, it’s time to select the gray hair. To select the gray hair, use the Quick Selection Tool. Simply click and drag over the gray hair to select it. When you are finished, the gray hair should be completely surrounded by the selection.
Step 4: Change the Color of the Gray Hair
Now that you have selected the gray hair, it’s time to change its color. To do this, go to the Image menu and select “Adjustments”. From the Adjustments menu, select “Hue/Saturation”. This will open the Hue/Saturation window. In the Hue/Saturation window, adjust the hue and saturation of the gray hair until it is the desired color. When you are finished, click “Ok”.
Step 5: Blur the Edges of the Gray Hair
Now that you have changed the color of the gray hair, you need to blur the edges of it. To do this, select the Blur Tool from the Tools panel. Then, simply brush over the edges of the gray hair to blur them. Make sure to not go too far or the gray hair will become blurry.
Step 6: Create a Mask
The next step is to create a mask for the gray hair. To do this, go to the Layer menu and select “Add Layer Mask”. This will add a mask to the layer that contains the gray hair. Now, using the Brush Tool, brush over the areas of the image that you want to remain unchanged. This will help you blend the gray hair into the rest of the image.
Step 7: Sharpen the Gray Hair
Once you have created the mask, you need to sharpen the gray hair. To do this, select the Unsharp Mask filter from the Filter menu. This will open the Unsharp Mask window. In the Unsharp Mask window, adjust the Amount, Radius, and Threshold until the gray hair looks sharp. When you are finished, click “Ok”.
Step 8: Save the Image
Once you have edited the gray hair, it’s time to save the image. To save the image, go to the File menu and select “Save As”. In the Save As window, choose a name for the image and make sure to select the correct file format. When you are finished, click “Save”.
Conclusion
By following these steps, you have successfully used Adobe Photoshop to eliminate gray hair from an image. It’s important to remember that the process may take some time and patience, but the results will be worth it. With a few simple steps, you can easily get rid of gray hair in Photoshop.
See also:
Retouching Skin In Photoshop.
How To Retouch Portraits In Photoshop.
Learn more about Photoshop